Jointing with the Router
With its limitless versatility, the router can cut a huge range of joints, from the very simple to the highly complex, often requiring little else other than a straight cutter and a few basic self made jigs.
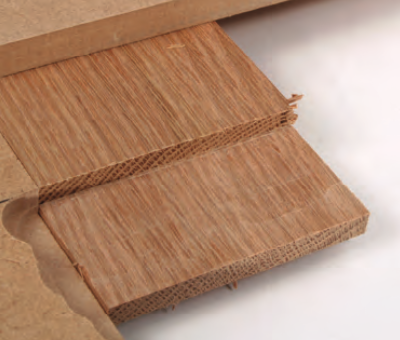
The ability to cut neat and effective joints is one of the most basic woodworking requirements, but often causes difficulty when using hand tools, even to relatively experienced woodworkers. However, using the router guarantees you the necessary accuracy, speed and consistency that is so difficult any other way.
Halving Joints
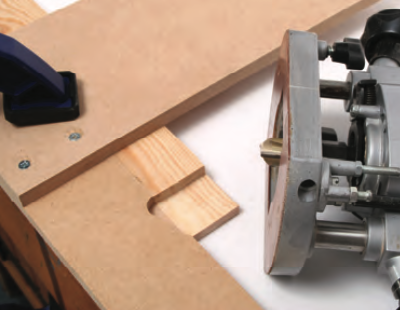
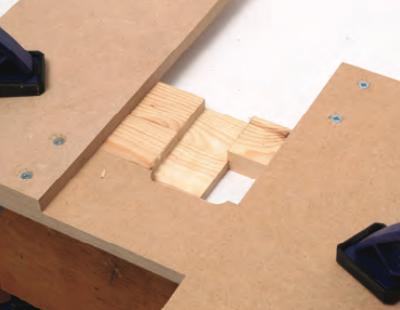
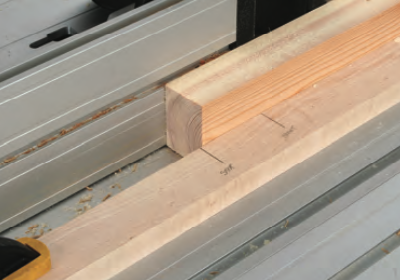
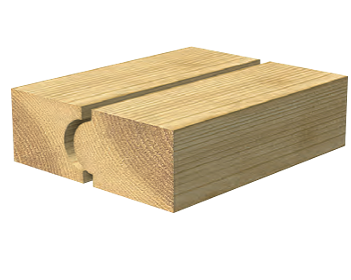
Although not the strongest or most elegant of joints, the halving joint is quick and easy to cut and has many uses in basic frame construction.
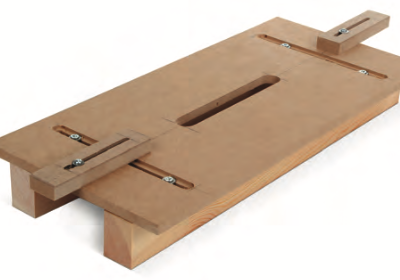
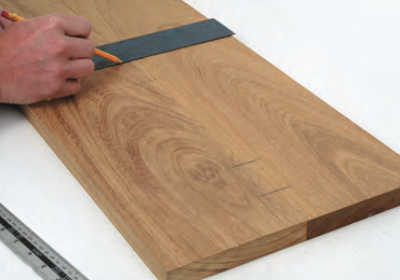
All types of halving joints such as cross, corner, mitred or angled, can be cut with just a straight router cutter and a simple jig.
The use of jigs means that if you are producing repetition work e.g. sets of rails of the same size, the components can usually be stacked and clamped together for cutting in one operation, considerably speeding up production and ensuring complete uniformity.
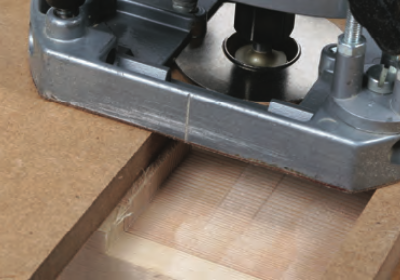
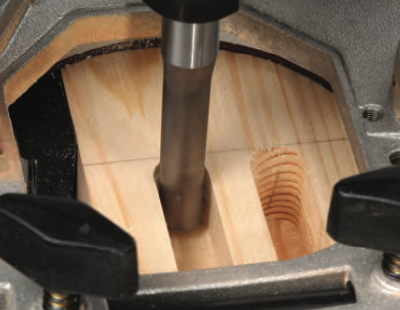
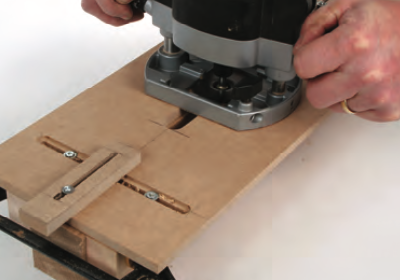
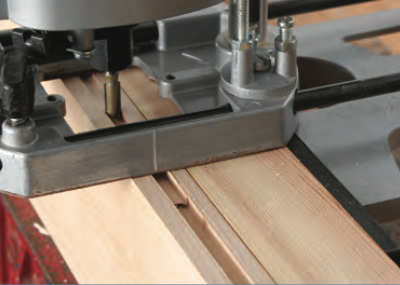
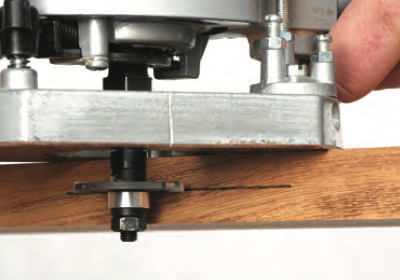
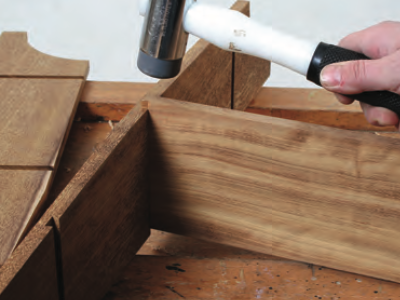
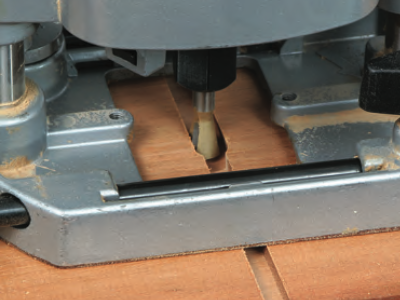
For all halving joints, the router is used with a straight cutter and the depth stop is set to the required depth.
To get the joint perfect, make some trial cuts from either side of a spare workpiece, adjusting the depth until the two cuts coincide. Always use the largest cutter available to suit the width of the housing and make the cut in a series of shallow passes of no more than 3mm each
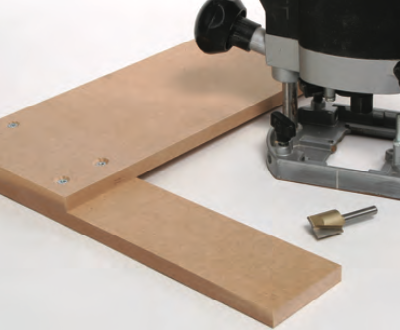
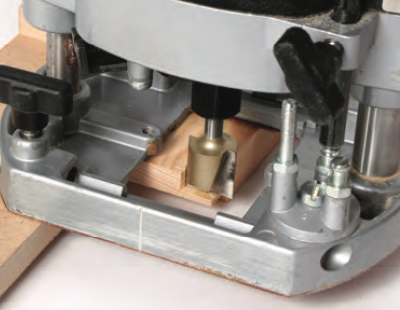
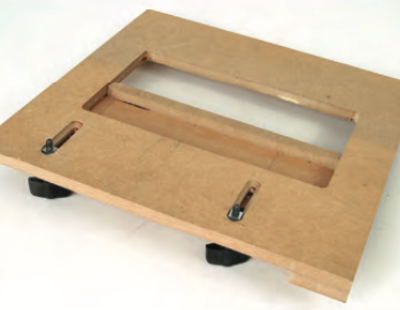
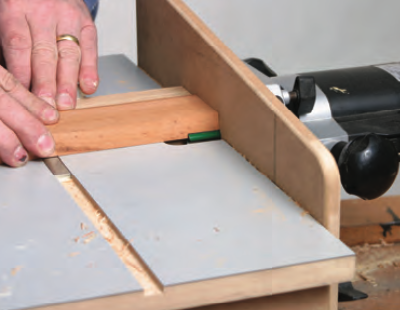
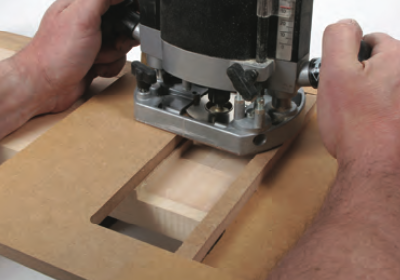
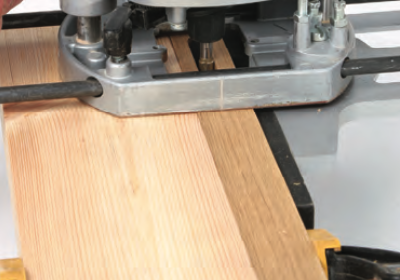
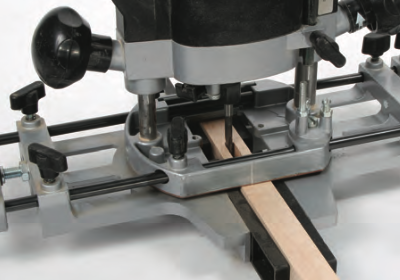
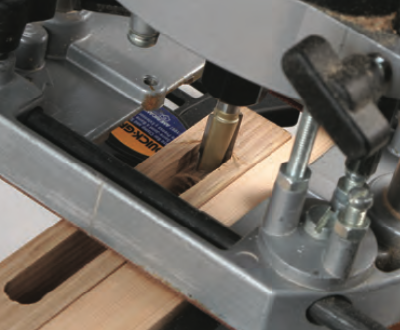
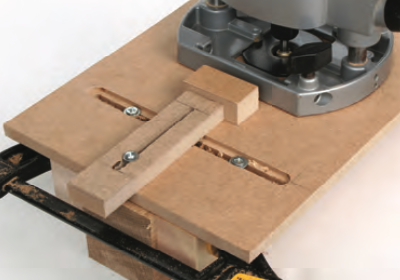
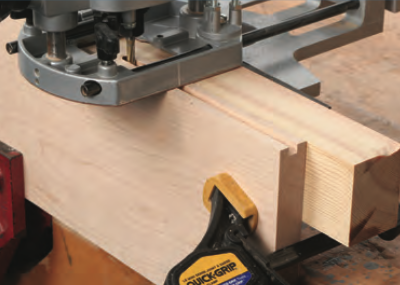
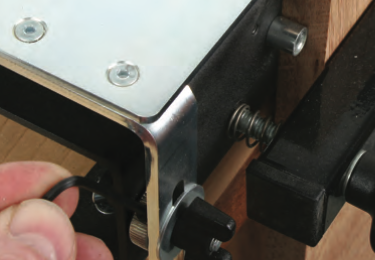
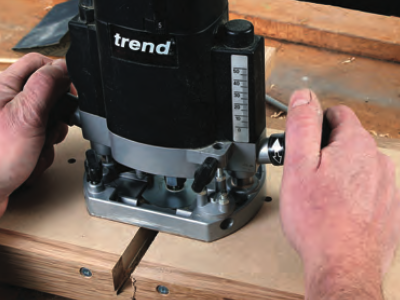
The corner halving joint can be cut with a simple jig made up from two pieces of MDF screwed together at right angles.
Use a pair of these jigs to cut a T-halving joint on a single piece.
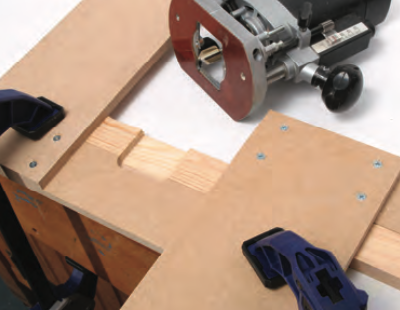
Or clamp them to both workpieces to make a cross halving joint.
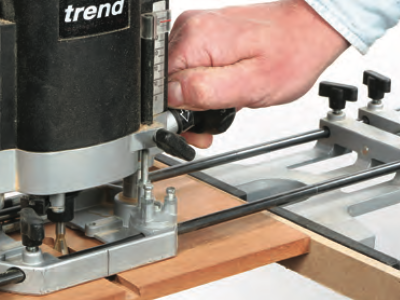
In use, the jig is clamped across the workpiece, set off from the line of the cut by the distance from the base of the router to the edge of the cutter.
This can be done either by measuring from the guide edge to the cut line, or by positioning the cutter against the cut line and bringing the jig up to the router base.
Alternatively, if you have to cut a halving joint on a regular basis it is worth making up a template jig to be used in conjunction with the guide bush.
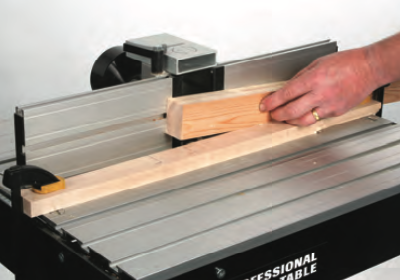
The router table provides the means of cutting the joint, particularly end and mitred variations. The workpiece has to be supported on a sliding carriage or with the mitre guide and must be firmly clamped to it to prevent ‘creep’.
The fence can be used as a stop, but as the cutter has to be left exposed, use a suitable guard to cover it if possible. The router depth stop is set to the final cutting depth, but this should be achieved in several shallow passes. The shoulder cut should be made first with a waste batten behind to minimise break-out.
Then the work is slid away from the fence and several passes taken to remove the rest of the waste, repeating the operation until the final depth setting is reached.
Yet another alternative is to use the horizontal router table, which perhaps offers the maximum possible support and therefore produces superb accuracy. As usual, take several shallow passes to reach the required depth.
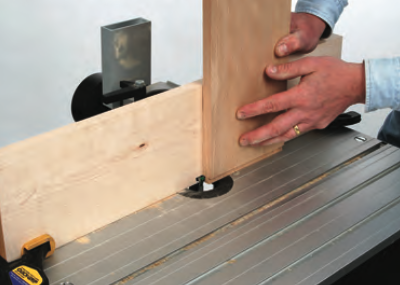
Tenons
A variation of the halving joint is the tenon, which, when fitted into a corresponding mortise, produces one of the strongest joints for framing and carcassing. Because of their strength, mortise and tenon joints are used in most forms of furniture construction where the tenon is simply glued into the mortise.
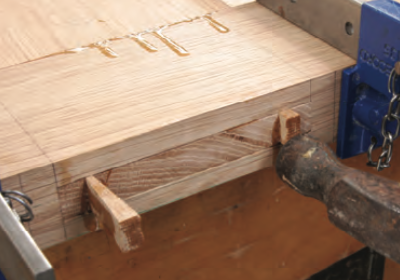
For heavier construction jobs, wedges or dowels are used to pull the joint up tight and to secure it.
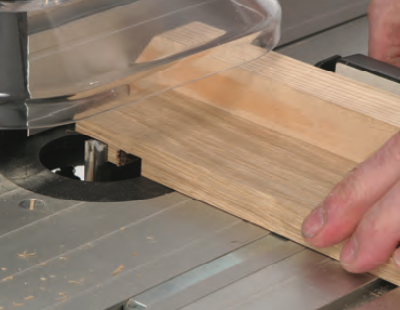
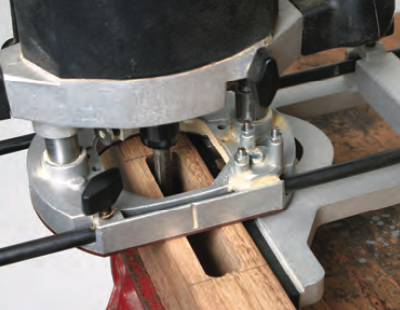
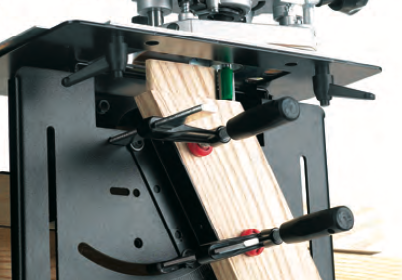
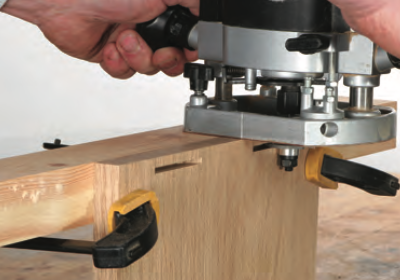
A tenon is cut in the same way as a halving joint, cutting one face first then turning it over to cut the second. If you need a haunch, it is probably easier to cut this by hand after the tenon has been machined.

Tenons are generally cut to be a third of the timber thickness, leaving the face sides of the assembled joint flush.
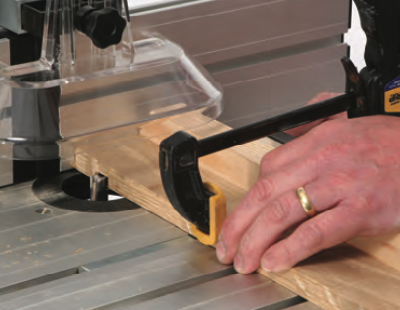
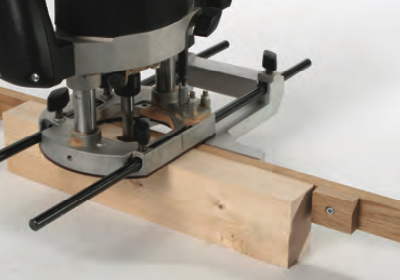
The simplest method of guiding the router for cutting tenon joints is to use one, or a pair, of right angle guides, like those for the halving joint.
For repetitive operations, several rails or battens can be clamped together for cutting at the same time.
It may be necessary to position a waste batten at the rear of the workpiece to prevent the inevitable break-out.

The same principle can be used for cutting angled tenons, just fix the stock to the top board at the required angle.
However, with any routing operations inaccuracies can be caused by the router tipping or turning in at the end of the jig or workpiece. To prevent this happening, use a slotted template fitted to the stock in the same way, either at 90° or at any required angle and use a guide bush to control the path of the router.
Remember to take account of the guide bush margin when lining the jig up for a cut.
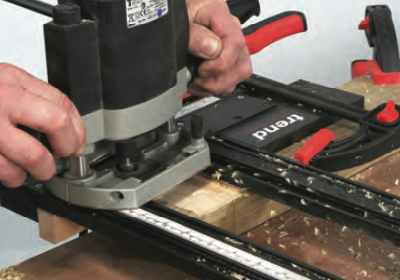
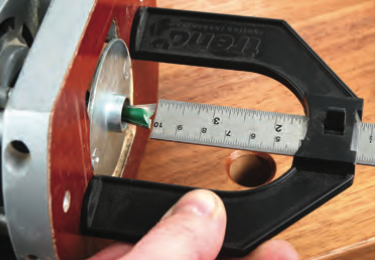
For regular use, the Trend Varijig allows you to cut different tenon sizes quickly & easily.
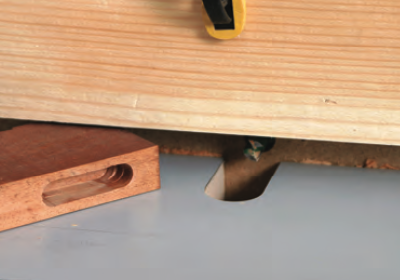
Routing mortises
As routed mortises are produced with a revolving cutter they will end up with radiused ends.
These can then either be squared out with a chisel, or the edges of the tenon can be rounded over with a chisel or rasp. The normal procedure is to make the mortise first and then cut the tenon to fit, rather than the other way round.
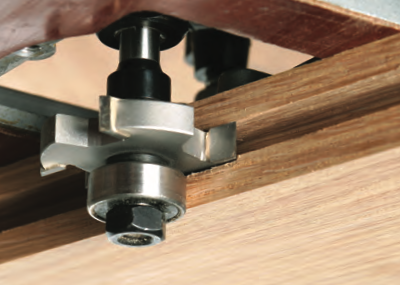
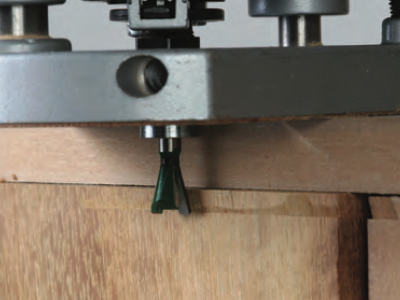
Two flute cutters with a bottom cut facility can be used for morticing, but will require frequent clearing to prevent the waste packing around the flutes.
A better alternative is to choose up-cut spiral cutters, as these lift the waste material out of the mortise. Alternatively, staggered tooth cutters are normally used for larger work, for their speed of cutting and chip clearance.
For small diameter deep mortises, long shank pocket cutters are another option.
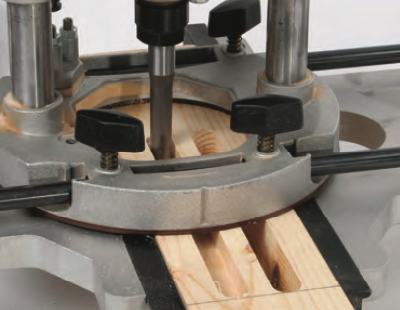
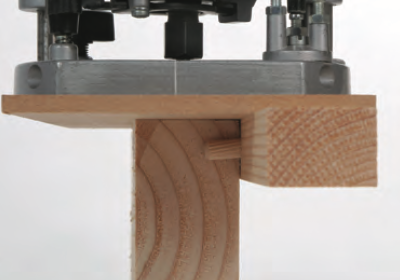
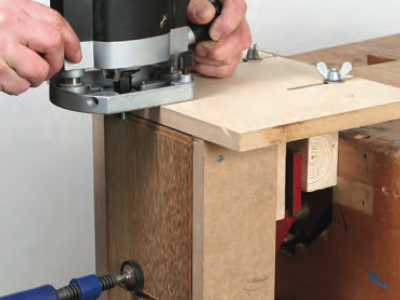
Mortises are generally cut on the narrow edge of the workpiece, so providing adequate support for the router base is often an issue. This can be overcome quite easily by temporarily clamping on a wide batten to provide a wider working surface.
Although the router can be guided by a single side-fence for mortise cutting, the addition of a second fence will prevent the cutter from running out of parallel to the rail edge. For wider rails or workpieces, it may be necessary to exchange the standard fence rods for longer ones.
To centre a cut precisely across the width of the workpiece, use a cutter slightly smaller in diameter than the width of the mortise. Make the first pass in one direction and then turn the router round making a second pass in the opposite direction.
This can then be repeated for each step until the full depth of the cut is reached. Both stopped and through mortises can be cut with the router depending on the depth, but if you are cutting through mortises, a backing piece should be fitted to prevent breakout. Alternatively, through mortises can be cut from both sides using a jig to accurately locate the cutter.
Twin parallel mortises can also be cut in
the same way using the two fences. One mortise is cut to the full depth before turning the router and cutting the second in the opposite direction.

It is usually accurate enough to mark the limits of the mortise on the work and then cut up to them by eye.
However, for accuracy and repeatability try fixing longer faces to the side fence and then fit stops to limit the cutter travel.
For long workpieces, a stop can be fitted to the front of the fence face to set the starting position and then the length of mortise can be gauged by eye.
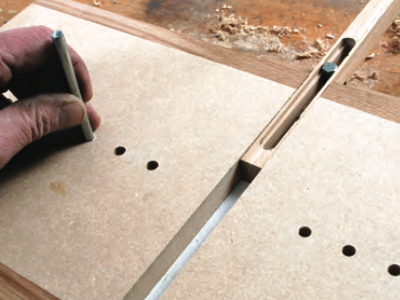
An alternative method of setting the length of a mortise is to use a side batten drilled to take movable dowels or fitted with sliding stops.
The dowel holes are drilled at equal centres and a sliding stop is fitted to set the distance of the mortise from the end of the workpiece.
The batten is clamped in place, flush with the top of the workpiece, ensuring that the clamps will not foul the router. The cutter is centred on the mortise and the side-fence is run against the face of the workpiece.
Haunched mortises can be cut by eye, but are ideal candidates for using a side batten, simply by moving the dowel to shorten the router travel when cutting the deeper part of the mortise.
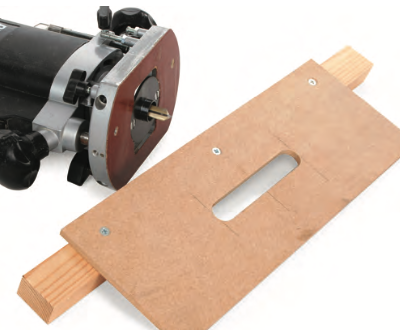
Another way to guarantee consistent identical mortises is to use a slotted template and the router fitted with an appropriate guide bush. These jigs are usually made for specific jobs, but with a little ingenuity you can make a universal template with adjustable stops and locating fences.
Simple slot templates can be made for use with specific guide bush diameters and to specific mortise lengths.
Remember that the slot in the template has to be routed to a length equal to the mortise length plus twice the guide bush margin. Also, the template should be big enough to support the router over the end of the workpiece with the guide bush having a smooth sliding fit in the slot.
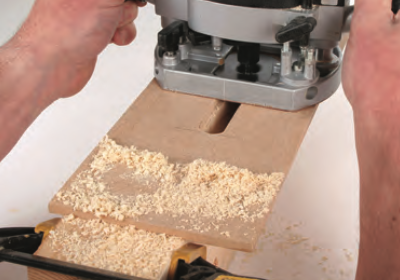
A batten is fixed to the underside of the template, positioned to centre the mortise on the workpiece. This also allows the template to be clamped in a bench vice. A single stop fitted to the underside of the template will position the mortise in exactly the same place each time.
To make the adjustable version, two locating battens are fixed beneath a much longer template which is slotted to allow them to slide in and out to centre and secure the template. To position the guide bush slot, a centre line is scribed at each end of the slot and located over the centreline of the first workpiece.
This arrangement is then clamped to the workpiece at a point as close to the mortise as possible.
Slotted length stops mounted on the face of the template are used to limit the length of the mortise.
For haunched mortises, a temporary extra stop can be fitted to the front stop, restricting the router travel to the deep section of the mortise.
Mortises can be cut on the router table by lowering the work down onto the cutter, but for both safety and accuracy, it is necessary to fit a second fence parallel to the table fence.
The cutter can then be centred between the two fences. Front and rear stops are useful, as the cut area is obscured from view and you cannot easily work to pencil lines on the workpiece, but note these can be transferred onto the secondary fence to indicate the start and stop points.
You must be very careful during this procedure, particularly with short pieces which should only be lowered onto the cutter with the end firmly up against a rear stop. Slide them forwards until they hit the front stop.
Repeat the procedure with each workpiece and then raise the cutter slightly, eventually reaching the full depth in a series of shallow passes.
An easier option, but using the same principle, involves the horizontal router table, where there is much more support for the workpiece and the cut is more visible.
If you are into volume production of small scale mortise and tenons joints, there are specialised jigs available. These allow you to cut both halves of the joint with only the one set-up to ensure it all fits together perfectly. As well as conventional straight joints, such a jig can be set to cut angled or even compound joints that are ideal for cabinet, chair and table construction.
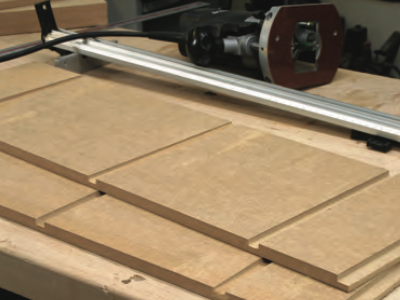
Edge to edge joints
It is often necessary to join boards edge to edge, sometimes trying to make the joint as invisible as possible and at other times, featuring it with some decorative detail.
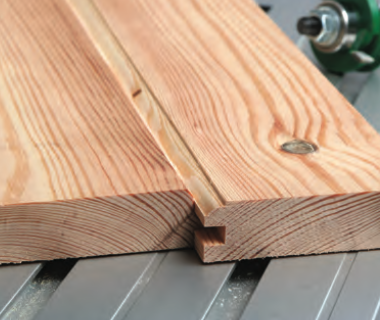
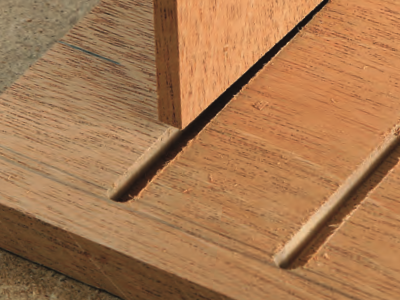
There are various types of edge to edge joints, the simplest being a form of tongue and groove joint, cutting either an integral tongue to fit in a groove on the next board, or cutting a groove in each piece and then fitting a loose tongue.
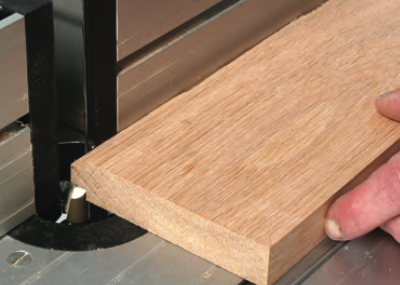
Edge grooves and rebates can be cut either with straight cutters, balancing the router vertically on the edge of the workpiece, or with self guiding slotting and grooving cutters on an arbor, which allow the router to be used with the base resting flat on the face of the board or panel.
If you are using a straight cutter, the workpiece must be clamped on edge in a vice, or against the edge of the bench. With long workpieces, suitable support must be provided at the ends and along their length to prevent bowing. Make sure that any clamps will not get in the way of the router and that there is enough clearance for the side-fence over the vice or any other supports.
For thin workpieces, you can increase the stability of the router by clamping a thick batten alongside the workpiece with the top edges flush. The batten should extend beyond the ends of the workpiece to allow the router to be fed smoothly onto and off the edge.
To form a groove, mark out its position and width on the end of the workpiece. Choose a cutter the same width as the groove, hold the router in place and adjust the side- fence to position it accurately. A fine fence adjuster is a real help here.
Make the cut in a series of shallow passes, feeding the router against the rotation of the cutter to help to keep the side-fence firmly against the face of the workpiece.

As with mortising, the process is more accurate if you can mount a second side-fence but this does require the work to be accurately thicknessed and dead straight.
Special slotting and grooving cutters mounted on a threaded arbor provide another alternative for grooving and in many ways this is a much easier way of doing the job, as the router has much better support when used flat on the face of the work.

The arbors are long enough to allow you to use a combination of cutters so you can build up wider cuts or use several cutters spaced apart to produce multiple grooves or tongues.
The depth of cut is set by mounting a guide bearing above or below the cutter and can therefore be altered by using different diameter guide bearings.
As before, running the cut from either face will ensure that the groove is perfectly centred. Most operations using these cutters allow the work to be cut in a single pass, but with hard or difficult timbers, the side-fence or a larger diameter guide bearing will limit the depth of the initial cut.
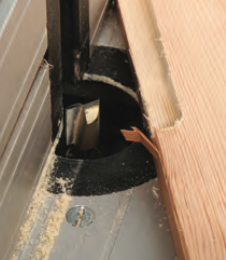
For short lengths of board or small panels, it is much easier and safer to cut edge grooves on the router table. Again, you can use both straight or arbor mounted cutters, but with straight cutters the work must be held perfectly vertical. To achieve this, it helps to fit a taller face board to the table fence.
Some form of side pressure guard is also useful to keep the work pushed hard up against the fence and keep the groove straight.
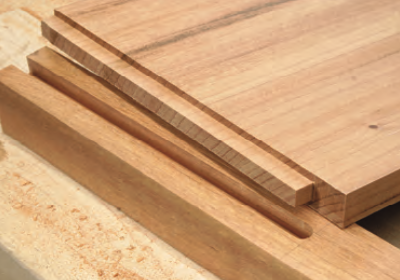
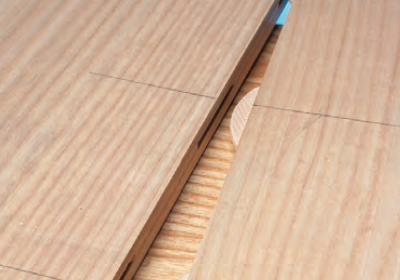
Cutting the groove is only half of the joint, you then have to cut the matching tongue.
In some cases, you can groove both edges then insert a loose tongue which can either be cut from plywood for maximum strength, or, alternatively, cut from timber that has been accurately thicknessed to the groove width. In this case, it is normal practice to cut the tongue across the end grain if possible.
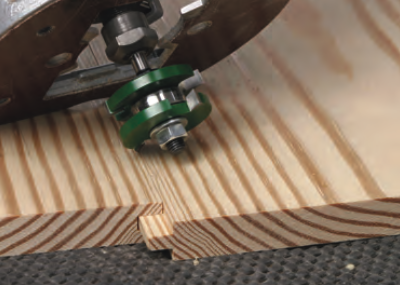
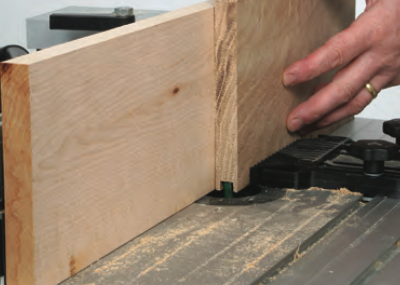
Integral tongues can be formed by cutting a rebate along both edges of the workpiece either using the router handheld or in a table.
In both cases, it is preferable to cut from the face of the work rather than the edge using a straight cutter, larger in diameter than the width of the rebate. Also, cut in a series of steps until the full rebate depth is reached. Having cut one side, turn the workpiece over and repeat on the opposite edge to form the same rebate depth and width. If the resulting tongue is tight in the groove, remove equal material from both rebates to keep the tongue centred across the board edge.
Self guiding rebate cutters can be used either in the router, hand held, or with it mounted under the router table, but the dimensions of the rebate will be restricted to the standard cutter and bearing diameters.

Arbor mounted groovers are another very effective way of cutting a tongue by using two identical cutters mounted on the same arbor. This allows you to form it in one operation by cutting both rebates at the same time.
The cutters are separated by a suitably sized guide bearing and shims to make up the required tongue thickness, the depth of the tongue being determined by the diameter of the guide bearing.
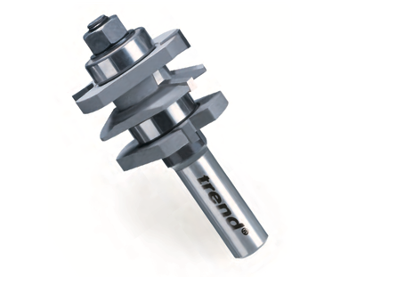
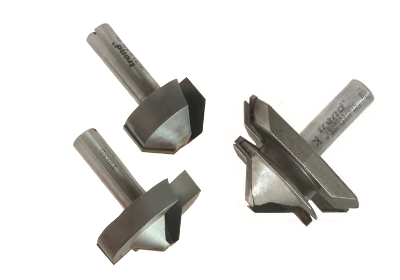
To form the classic V joint tongue and groove effect, ‘Match-lining’ cutter sets are available. These comprise of three interchangeable cutters of two different diameters, with one of them being ground to a stepped chamfer profile.
Two different diameter guide bearings are used to vary the depth of cut for the joint profiles. In use, the cutters are assembled to cut one side of the joint before being re-assembled in a different sequence to cut the matching reverse profile.
For smaller one-off jobs, the same effect is obtained by cutting a standard tongue and groove profile and then adding the V chamfer as another operation using a V groove cutter.
For a more decorative effect, you can use other shapes of moulding cutters for this final operation or even a profile scribing cutter which will do the whole job in one go, though you will then have to machine this in a router table.
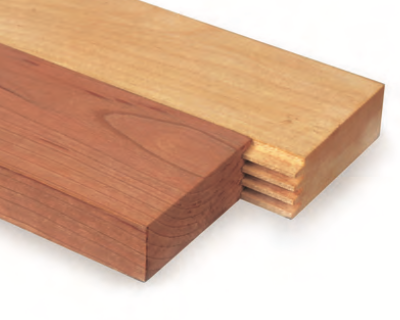
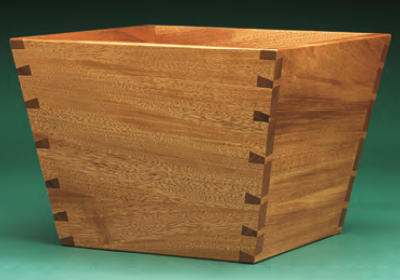
The object of most edge to edge joints is to increase the surface area available for gluing and this is epitomised by the finger joint which effectively increases the glue line by a factor of three.

A dedicated cutter is fitted with a series of shaped cutters to produce the profile, the exact arrangement being varied to suit the timber thickness. Ideally the cut is made with the router under a table but it can also be made freehand.
Another variation of the standard tongue and groove joint is the ‘bead joint’, which is cut with a matched pair of specialised cutters such as the sunk and staff bead.
These can again be used either handheld or in the router table, but note that the staff bead cutter does remove material from the guide edge, so the outfeed fence must be shimmed out accordingly.
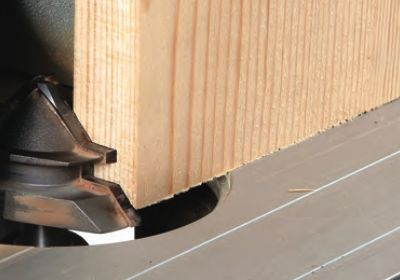
The same joint on a bigger scale is the ‘cove joint’, again, cut with a matched pair of cutters. A useful feature of this joint is that it allows you to join up several narrow strips edge to edge, to make curved panels.
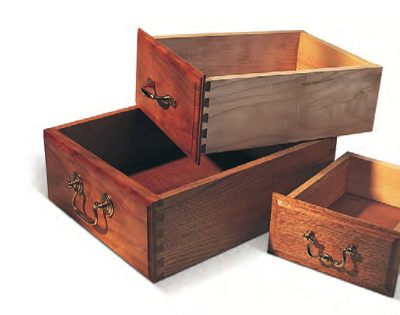
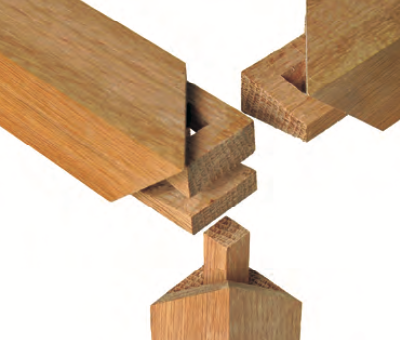
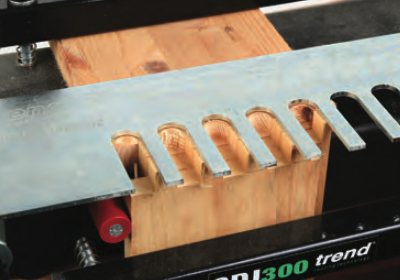
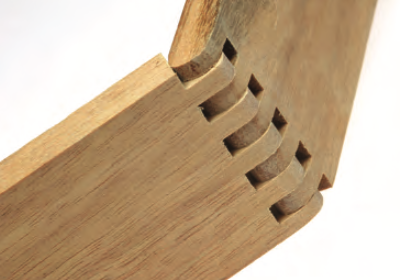
Dovetails
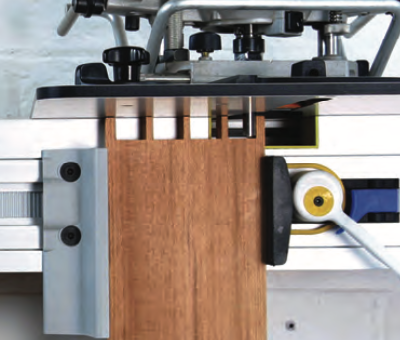
The dovetail is the classic woodworking joint, combining pleasing visual appearance with superb strength, but it is difficult to produce accurately by hand unless you are experienced and highly skilled. Fortunately, there are a number of jigs available that can be used with the router to cut identical dovetails both quickly and consistently.

The simplest of the jigs has a fixed finger template matched to a specific size dovetail cutter and guide bush combination, which cuts a regular pattern of lap dovetails that is rather obviously machine cut.
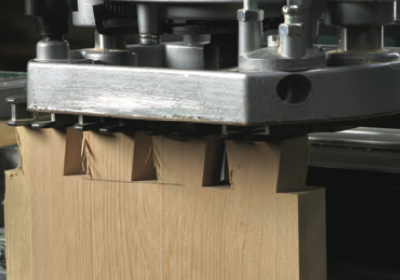
However, there are more expensive and sophisticated versions that allow you to mimic the appearance of a hand cut joint, with variable spacing of the pins and tails in both lap and through dovetail styles.
The more advanced jigs even allow you to cut really exotic looking joints that are impossible to produce any other way.
They all work on the same basic principle using a precision template, either fixed or adjustable. This ensures the spacing of the pins and tails is perfect and the cutter itself will ensure that the size and pitch remains the same.
The more elaborate machining centres allow for the greatest differences in tail width and spacing. They can be used for complicated variations of the joint. Their inherent rigidity and control also allows the use of finer pitch cutters, which makes the cut appear more like a hand cut one.
Basic Operation
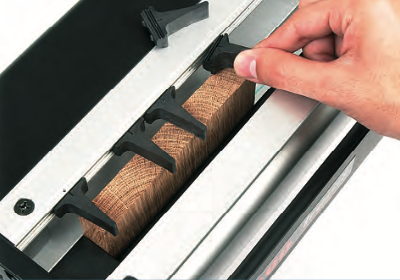
The workpieces are clamped in the jig aligned at right angles to each other but offset by half the template spacing (pitch). During the cutting operation the router is controlled by a guide bush running in a fixed finger template, both parts of the joint being cut in one operation.
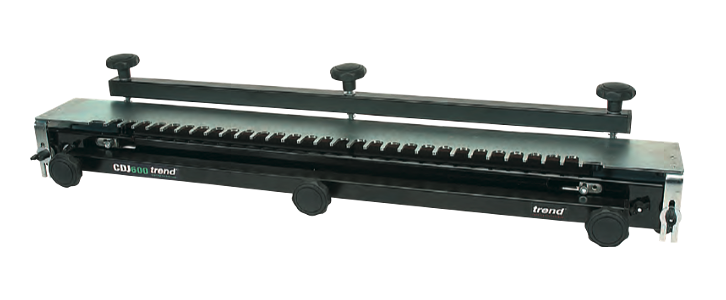
The normal capacity of the jig is 300mm but there are larger versions taking material up to 600mm wide. Fixed finger templates are matched to a specific size of dovetail cutter and guide bush combination. This produces the characteristic equal width and equally spaced pins and tails. Most jigs are supplied with an appropriate guide bush to match the template spacing, but if it doesn’t fit your router, you can use a sub-base. Jigs supplied with bearing guided cutters make this unnecessary as they can be used with any router.
The spacing or pitch on fixed finger templates is always equal, so it is essential that the workpiece is a multiple of that spacing e.g. spacing = 21.5mm, therefore width of material = 43mm, 64.5mm, 86mm, 107.5mm etc. As both parts of the joint are cut in the jig at the same time, they need to be offset by half of this spacing i.e. 21.5 ÷ 2 = 10.75.
This offset is determined by either adjustable stops or fixed pins fitted to the jig. Adjustable end stops vary on different makes of jig, but those consisting of stepped metal plates are the easiest to set and by allowing some adjustment to the joint, slight variations in material width and appearance are then possible.
Separate adjustable stops may also be used to cut rebated drawer fronts. This enhances the look of the finished joint by allowing extra width to be added to the outer pins.
The exact method of clamping the work varies from jig to jig, but it is vital that the two pieces are held securely and in line during the cut. Threaded screw or cam clamps are the most common, although the latter are far quicker and easier to use, but in both cases narrow workpieces may require extra clamping, or spacers at the other end, to prevent them moving.
Using dovetail jigs
Before using any dovetail jig, it is essential that you spend time cutting trial joints, as the only way to produce the exact spacings and depths is by trial and error.
So remember to machine up a few odd sections of material to practice on before you do it for real. This initial set-up may take some time but once achieved, you can cut each joint quickly and consistently. As every jig is slightly different, read the setting instructions carefully before you start, but the following gives a general guide to the procedures involved using a bush guided jig.

When both stops are accurately set, the bottom edges of the drawer will assemble flush, but do remember to mark the orientation of each piece carefully.
The stops should be set with the vertical pair centred on the first or second slot, whilst the horizontal stops should be centred on half the width of a finger from the edge of the first slot.
Fit the timber into the jig with the drawer side vertical and face side inwards. Then fit the drawer front in horizontally, with the face side down, butting it up against the vertical piece, making sure they are flush.
Fit the finger template in place, adjusting it backwards and forwards with the spacing nuts until the sight line corresponds to the join between the two components. Once set, these spacer nuts allow the template to be removed and refitted perfectly.
With all bush guided cutter templates, the length of the tails and pins is governed by the length of the template slot.
The cutter depth is set initially to about 17mm for the standard 12.7mm dovetail jigs (a setting gauge is usually supplied for this).
A scoring cut is made by first traversing lightly across the work from right to left to minimise break-out.
The cutter is then fed between each finger working from left to right. Make sure the guide bush bottoms into the comb and keep the router level at all times. Do not force the cutter into the wood as this will cause it to snatch and lift, resulting in a poor and loose fitting joint.
As it is very difficult to realign workpieces back into a dovetail jig once they have been removed, always check that the joints are fully cut before removing them from the jig. If all is well, unclamp them and rotate one through 180° to mate them together. It is unlikely that they will fit perfectly first time and you may need to make some small adjustments.
If the joint is too loose, increase the cutting depth slightly. If the joint is too tight, raise the cutter a fraction. If the sockets are too deep, bring the finger template forward on its adjusters. Move it backwards if the tails don’t go fully home.
Lap dovetail jigs
Most simple dovetail jigs are fitted with a standard template to cut lap dovetails of a specific size and pitch, but alternative sized templates may be available and even templates for comb jointing and dowelling. These router cut lap dovetails are generally used in the construction of drawers, in particular for modular unit furniture.
Through dovetail jigs
Through dovetails can also be cut with the router using fixed or adjustable finger templates. In this case, two matched cutters have to be used, a dovetail cutter for the tails and a straight cutter for the pins.
Unlike the lap dovetail jig, each part of the joint is held vertically in turn for cutting either the tails or pins, with a piece of waste material behind to minimise break-out.
Various versions of this type of jig are available, either with fixed or adjustable finger templates. For fixed finger templates the width of material being jointed must still be a multiple of the pitch.
Adjustable finger templates, as found on the Trend DC400 multi functional dovetail jig, can be set up to suit any width of timber and allow you to vary the pin and tail positions and spacings with ease.
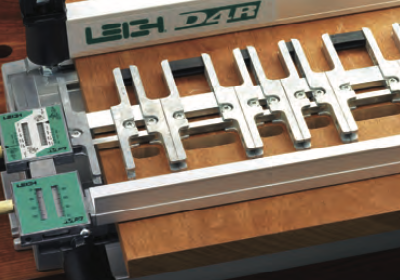
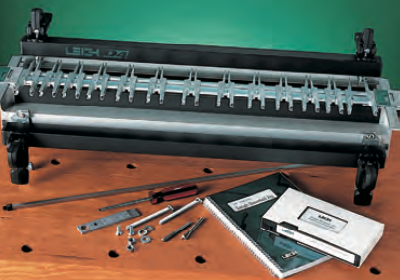
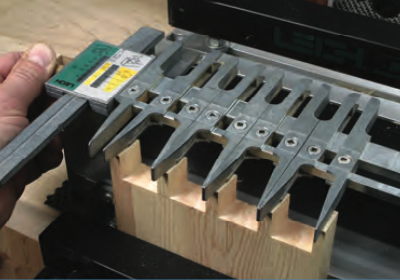
Both through and lap (half blind) dovetails can be cut on the more sophisticated adjustable dovetail jigs such as the Leigh jig. This jig features excellent adjustability and has a complete range of guide bushes available for virtually all makes of router.
With additional accessories and templates, it can also be used to cut mortise and tenon, finger or comb joints, Isoloc joints and sliding and oblique dovetails.
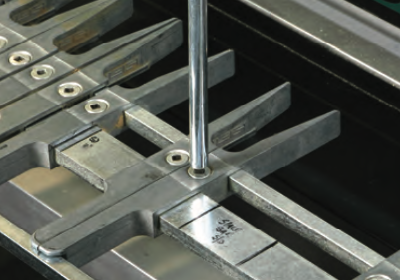
The standard dovetail template consists of separate fingers mounted on a solid bar. Their positioning is adjustable to allow variations in the width and spacing of individual dovetails and their pins. This also means that a range of cutter lengths and angles can be used with the same template.
By setting the fingers to the required pin spacing and then rotating the template through 180 degrees, this automatically sets the reverse ends of the finger for cutting the tails and ensures a precise fit of pins and tails.
In use, the timber is held in the jig by quick release bar clamps. For through dovetails, both workpieces are alternately held vertically in the front bar clamp. For half blind (lap) dovetails, the tail board is held vertically in the front bar clamp and the pin board is held horizontally under the top bar clamp.

The edges of the workpieces are automatically aligned by pre-set stops and the fit of the joint is set precisely using colour coded graduated scales incorporated into each end of the template. As before, matched dovetail and straight cutters are used for cutting through dovetails, whilst half-blind dovetails are formed using the same cutter for both joint profiles.
Machining centres
These machining centres with their sliding carriages are truly universal and allow you to cut virtually any type of dovetail joint without additional templates.
Their main advantage is that the pin and tail spacings can be set by eye and several components can be cut at once. Also they are not cutter specific and you can use any suitable dovetail cutter without having to worry about matching it up to a suitable guide bush.
As the timber size is not limited by the jig or template, dovetails can be cut in narrow boards as well as rail ends and other carcassing and frame components. Not only does this set up allow variations in spacing and pitch, it also allows the workpiece to be canted at any angle so mitre and secret mitred dovetails, exhibition case joints and other complex joints can be machined very precisely.
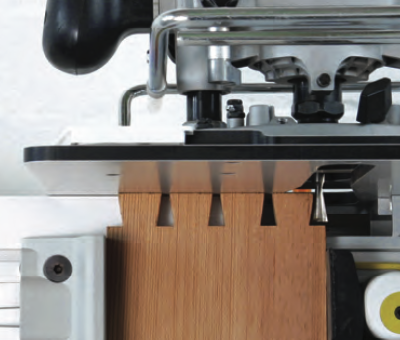
With such precise and rigid control of the cutter, afforded by the combination of the sliding work carriage, traversing plate and variable clamping facility, the benefits of using HSS fine pitch cutters can be realised, with minimal risk of breakage. Unlike template cut dovetails, fine pitch dovetails can be cut on machines such as the Woodrat, producing far more elegant dovetails than is possible with template cut joints.
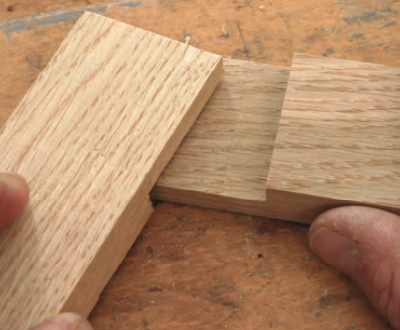
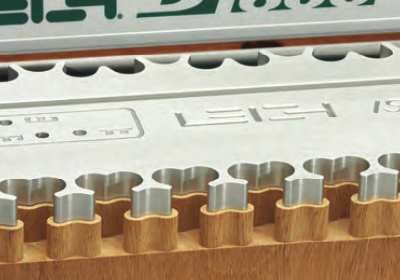
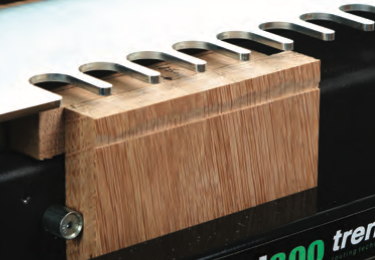
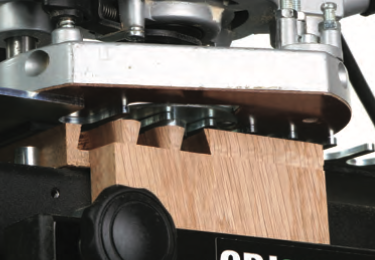
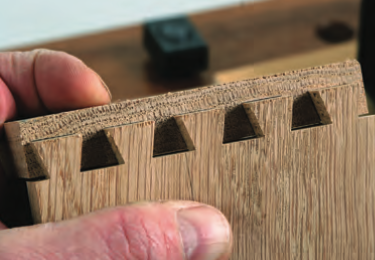
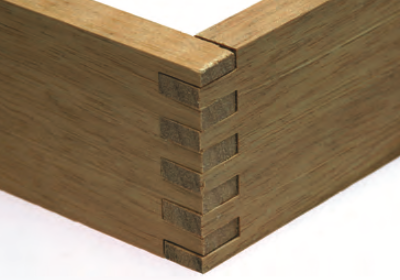
Comb Joints
The comb or box joint is a very neat and strong method of jointing drawers, boxes and carcasses.
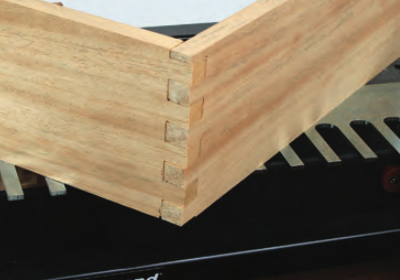
Although not as decorative or as inherently strong as the dovetail, it does however provide a huge surface area for gluing which is what gives it strength.
It is usually used for more functional pieces, though it makes a nice feature if contrasting timbers are used for opposing pieces.
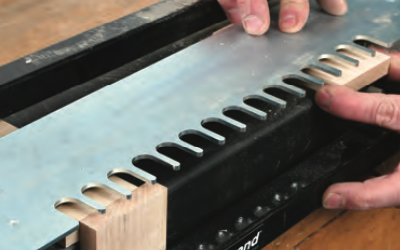
Traditionally comb joints were cut on a circular saw fitted with a wobble saw or a dado blade, but this practice is now illegal as it requires the removal of the crown guard. The router is an eminently suitable replacement as the cutter produces a perfectly square and flat bottomed cut.
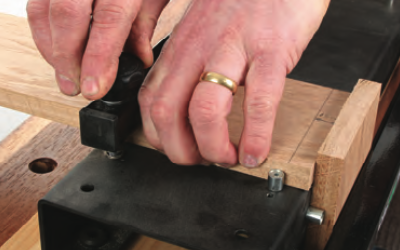
Like the dovetail, the comb joint relies on the use of a jig of some sort for accurate and consistent cutting. Fortunately many of the proprietary dovetail jigs can also be used for comb jointing, you just need to change the template to a suitable box jointing one and then use a straight two flute cutter.
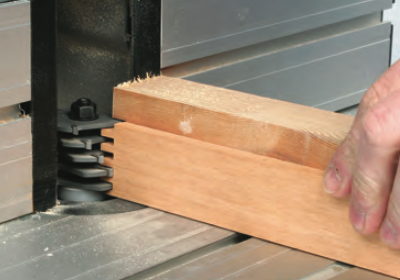
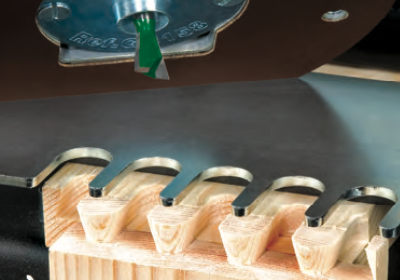
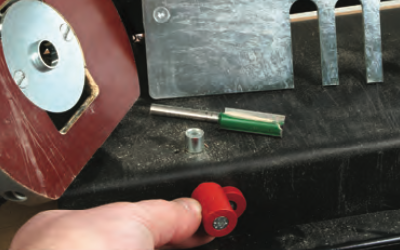
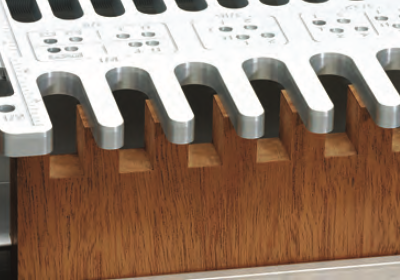
Whilst these jigs are ideal for cutting comb joints on bigger workpieces, smaller work can be cut more quickly and in one operation. A dedicated comb cutter is fitted in a heavy duty router in a fixed position under the router table. These cutters consist of a set of five 4mm wide groovers mounted on an arbor with a selection of bearings to control the length of the fingers.
Once set up, a comb cutter system is the ideal way of mass producing small boxes, although the maximum capacity is 40 mm.
With a little ingenuity, you can even turn the comb joint into a decorative hinge. Round over either end of the work before you cut the joint, then drill through and insert a fine pin as the pivot point.
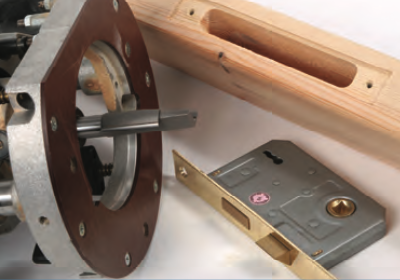
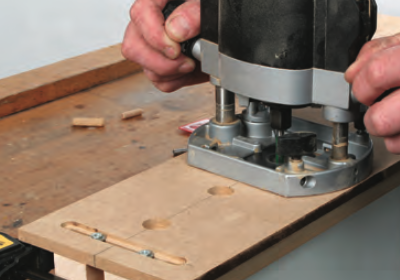
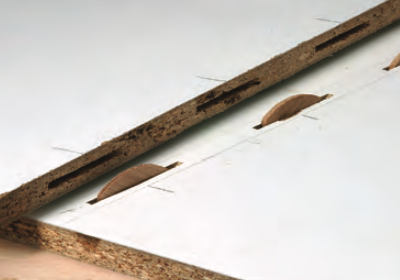
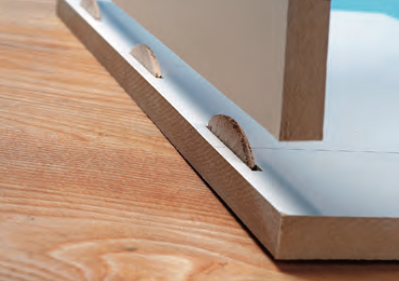
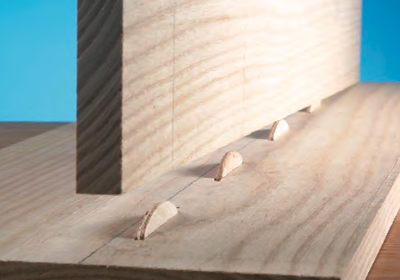
Dowel Joints
Dowels are a very effective way of reinforcing a straight butt joint and are mainly used for jointing wide pieces of natural timber, particle or fibre boards.
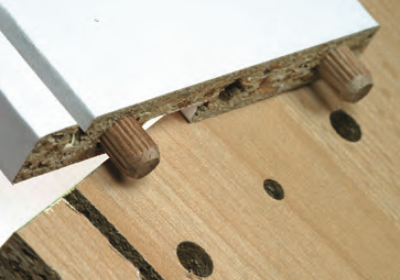
They can also be used to form framing and carcassing joints as an alternative to mortise and tenon joints. As well as strengthening the joint, dowels also ensure perfect positioning of mating pieces but they do obviously rely on accurate alignment.
The dowel holes must mate perfectly on each piece to ensure that faces, edges and corners are flush on assembly.
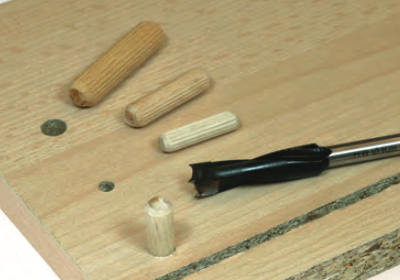
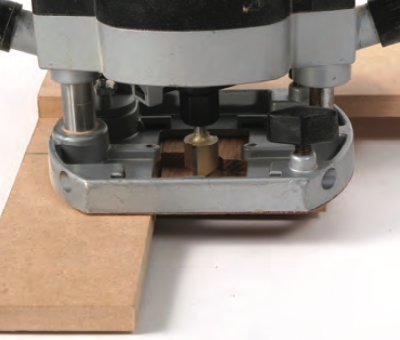
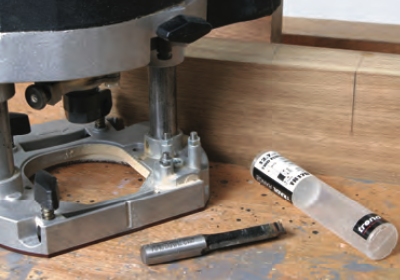
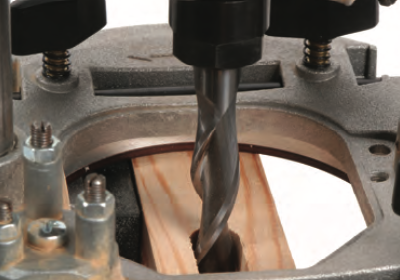
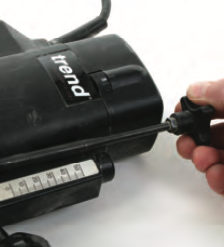
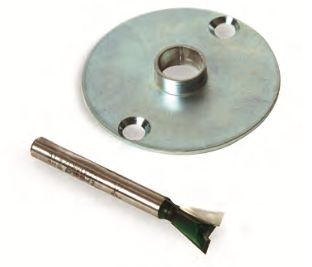
Ready made packs of dowels are generally available in diameters of 6, 8 and 10 mm. The holes are formed with special router dowel drills designed to cope with high rotation speeds.
These have a slow spiral to help waste clearance, a pointed centre tip for easy alignment and sharp side spurs for a clean entry. Standard single and two flute cutters can also be used, as long as they have end cutting flutes, but they are not as easy to plunge accurately.
On flat panels, the holes can be cut by eye, aligning the drill centre spur on a pre- marked point.
On a panel edge, twin side fences can be used on the router to position and centre the drill.
For repetitive work, the drilling process can be speeded up by using a spacing jig or side batten, or for even better accuracy, by using a guide bush and template.
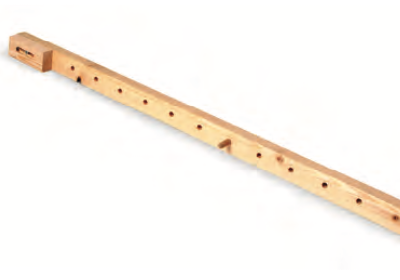
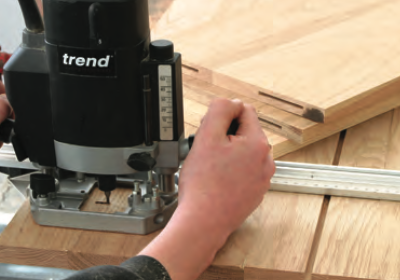
Dowel spacing jig
The dowel spacing jig consists of two battens joined at right angles. The required dowel spacing can be marked off along the edge of the top piece, but to avoid confusion, spacing marks can be set out on a strip of masking tape stuck to the jig.
This tape can then be removed to allow different spacings to be set out for future projects. An added refinement is some form of stop to align the jig in the same place for each workpiece.
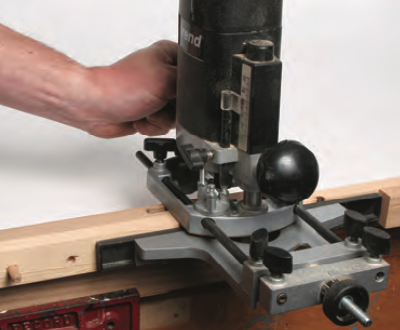
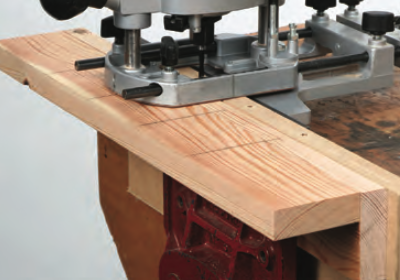
Mark a centre line along the top edge of the workpiece and clamp it upright in the bench vice, then clamp the spacing jig flush to the edge of the work and adjust the router side-fence to align the centre point of the cutter onto the centre line of the workpiece.
Scribe the centre line of the cutter on the edge of the router baseplate. (A vertical line is often engraved by the manufacturer).Set the depth stop to allow the cutter to plunge cut to a fraction more (1.5mm) than half the dowel length.
Align the baseplate centre line at each dowel position in turn and plunge cut to the full depth. It may be necessary to cut in shallow steps if you are using a standard cutter and waste clearance is slow. However, take care to relocate the cutter precisely if it is lifted completely clear of the hole during the boring operation.
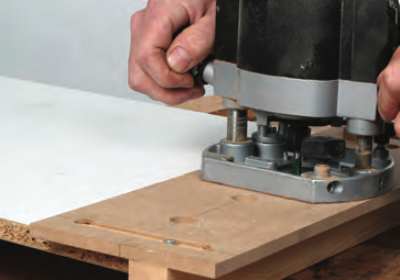
Template dowelling

A quicker and more accurate method of dowelling is to use a template. These are available ready made in limited form but it is often more practical to make your own to suit a particular job.
Ideally the dowel template should be cut from clear polycarbonate, acrylic or thin MDF, but make it big enough to provide adequate support for the router and with room for fitting the spacing bars.
Scribe a centre line along the template face and mark off the dowel hole positions at the required intervals. Carefully indent each hole centre to align the drill precisely and bore a hole to perfectly match a suitable guide bush; one around 12mm diameter is ideal, as it allows plenty of clearance around even the largest of dowel drills. Use a pillar drill to ensure that the holes are drilled at right angles to the template face.
Cut a couple of narrow slots across the template at each end and recess these on the top face to take the screws that hold the locating battens. The battens themselves can be made from any suitable timber but make sure they are straight and true. Use pan head or countersunk screws to fix the battens to the underside of the template, and make sure the router slides freely over the top of them.
Edge dowelling with template
Line up the template centre line with the centre line of the board, slide in the locating battens and tighten up securely. A single clamp will normally provide enough pressure to stop the jig sliding out of position.
Fit the appropriate guide bush to the router and set the depth stop to allow the cutter to plunge cut to a fraction more than half the dowel length, but remember to allow for the thickness of the template.
Locate the guide bush into the selected template holes and plunge cut to the full depth. To avoid boring in the wrong place cover any unwanted holes on the template with masking tape.
Corner dowelling
Bore the holes in the end panel as above, then remove one of the locating battens and slide the template up until the remaining batten butts up against the end of the other workpiece, holding it firmly with a clamp or double-sided tape.
Face dowelling

Mark the centre line of the dowel holes across the full width of the work. Remove both of the battens and clamp the template in position, aligning the centre line on the template over the centre line on the work piece.
Use double sided tape to hold the template on wide boards if it is difficult to reach in with clamps. Locate the guide bush into the template holes and plunge cut to the full depth as before.
Proprietary dowelling jig
Some dovetail jigs can also be fitted with a dowelling template that replaces the dovetail finger template. These are used with a guide bush to locate the router at the required dowel positions.
Wide boards up to 610 mm can be accommodated on some of the larger jigs but if you have one of the smaller ones, wider boards can be drilled by clamping the jig to the bench and sliding the work past it.
Biscuit jointing
Another way of reinforcing a joint is to use a ‘biscuit’ which is essentially just a flat dowel. The main advantage of biscuit jointing is that the process doesn’t require the same degree of precision that is needed with standard dowels, and whilst the joint is immensely strong, there is a small amount of ‘give’ available at the assembly stage.
There are biscuit jointers available as a dedicated power tool to cut the necessary recesses, but it is a process that can be carried out equally well with the router.
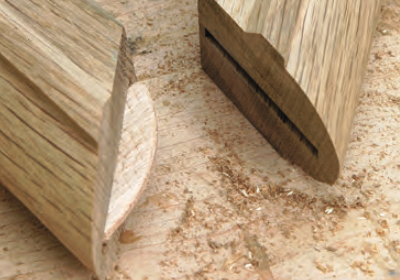
A biscuit joint is ideal for edge to edge joints, butt joints and corner butt joints. It can even be used to reinforce tricky mitre joints, and works well in either solid timber or manmade boards.
The biscuits are made from compressed hardwood chips, usually beech, and are set into semi-circular recesses cut into the mating faces of the joint.
When assembled, the flat face of the dowel offers a large surface area for gluing, far more than is possible with round dowels. Because the pockets are relatively short, unlike the grooves in loose tongued edge joints, the edges are not left weak and the joint is very strong. The glue causes the compressed fibres of the biscuits to swell slightly and this helps tighten the biscuit in its recess. However, it is unlikely to distort the face of the work, unless it is particularly thin.

Spare biscuits should be kept in a sealed container or bag to prevent them swelling before use, particularly if your workshop is damp.
As well as being structural they are also locational, holding components in place and stopping them sliding about as you clamp up. For wide workpieces, use two parallel rows of biscuits.
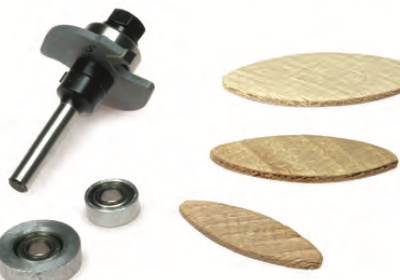
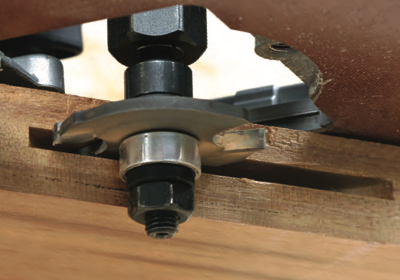
For edge work, you can use a biscuit jointer set which consists of a 4mm flat slotting cutter fitted to a threaded arbor with a selection of three different diameter bearings, 15mm, 19mm, and 23mm to vary the depth of cut for each size of biscuit.
For face work, the arbor mounted cutter cannot be used so you will also need a 4mm diameter straight cutter. The depth of cut for this straight cutter is set from the router’s depth gauge and stop, allowing 1.5mm extra depth as a gap for gluing.
Whilst proper biscuit jointing tools use a 4mm wide blade, whose radius matches that of the biscuit, a smaller diameter cutter is used in a plunge router system.
This means you have to move the router forwards to form the required length of groove and the end radius will not match that of the biscuit, so it is theoretically not as strong, but this is rarely a problem in practice.
Edge jointing
Biscuit dowel recesses are cut on the edge of boards and rails using the arbor mounted grooving cutter. Fit the required diameter guide bearing before fitting the arbor in the router.
With a marking gauge, scribe a short centre line along the edge of the workpiece. Position the router on the face of the workpiece and centre the grooving cutter on it (i.e. 2mm either side of the line). This setting is not critical and you can do it by eye, provided you make all the cuts from the face side.
Hold the two joint edges together with the face sides uppermost and the face edges together. Mark out the centreline for each biscuit, as well as the end points and square these across both boards.
Then clamp the edge of one board, face side up, overhanging the bench and centre the arbor on the first dowel position.
Cut sideways into the edge of the board to full depth, then move the router backwards and forwards to create the required length of groove. It helps at the assembly stage to make these grooves fractionally longer than necessary to allow a little positioning room. Repeat the procedure at each dowel position and on each board.
Corner joints
Groove the edge of the first component as above, and then if the length permits, clamp the other one end up in the vice. (If this is not possible it will need to be clamped on the bench face side up and the router held horizontally.)
Keep the grooving cutter depth set as for the edge component. Clamp a parallel squared batten flush along the edge of the second board to provide a wider edge to support the router. Cut the recesses as before.
T-joints
As the grooving cutter cannot be used in the middle of the face of the workpiece, replace it with the 4mm straight cutter and set the depth of cut depending on the biscuit size to be used. Draw the centre line across the face of the board marking out the position of the biscuit slots using the already grooved component as a template.
Mark off half the width of the router base plate from one side of the line at both ends and clamp a straight batten across in this position. Use this as a guide to cut each slot to the full depth in a series of 2mm steps.

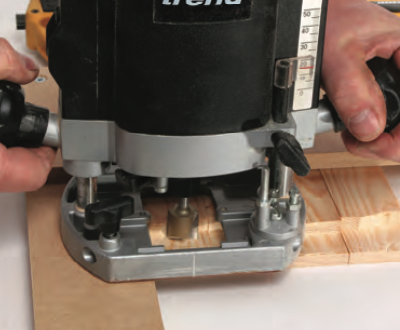
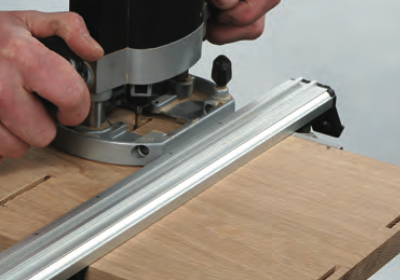
Mitred joints can be reinforced with biscuits using the router handheld and guided with a template jig, or for heavy duty applications a jig on the router table can be used.
Corner Joints
A right angled corner joint is probably the most common woodworking requirement if you are making boxes, cabinets, drawers, chests etc. Although you can use the router to make elaborate joints like dovetails, there are a whole range of other options. The router can be fitted with a straight cutter and side-fence, or alternatively mounted in the router table. For more complicated joints, you can make up simple jigs or buy specialised cutters for a particular application.

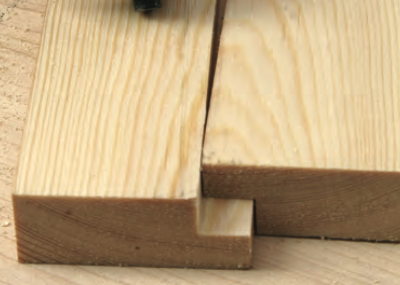
The simplest corner joint is the rebate joint, where one piece is rebated into the other. This provides a more positive location than a simple butt joint and also increases the gluing area. As with all these corner joints, it is essential that the ends of the workpieces are all cut perfectly square and true.
The grooved rebate joint is a stronger version of the joint, providing a definite registration for each piece. The groove usually extends to half the thickness of the work, with the tongue one third the thickness of the piece, though nothing is critical and you can juggle the dimensions particularly if you are jointing different thickness pieces.

The corner locking joint is a further refinement with a double interlocking rebate resulting in another very strong joint. It is best cut on the router table but a very simple jig makes it foolproof if you use a slotting cutter. A real advantage is that it can be used for joints where one component overlaps the other as in a drawer front.
If you are a more experienced user, there are dedicated cutters that can produce more elaborate corner joints such as mitred types for a really neat finish.
These cutters will more than repay their cost in a mass production situation, though they usually have to be used in a router table.
The simplest variation is the mitre corner joint that has to be cut with two separate cutters.
However, a mitre lock joint is cut with a single cutter, making a separate pass along the edge of each piece.
Drawers can be cut and assembled very quickly using the special drawer lock joint cutter which maximises the glue line for a really strong joint.
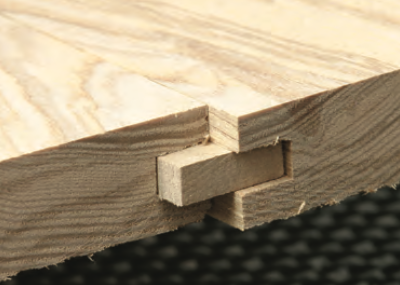
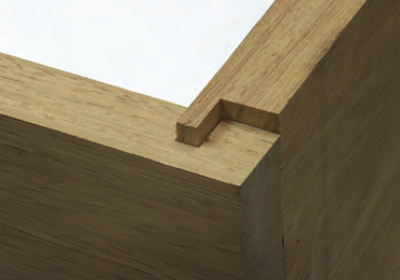
Housing Joints
Housings are shallow slots cut across the width of the workpiece, usually to accommodate a shelf or divider. There are various alternatives, all of which are easily cut with the router.
The simplest is the through housing which is just a slot of just the right width to make the shelf a tight fit.
For a neater appearance, the stopped housing is better as the groove doesn’t come through onto the edge.
However, the front end of the housing is best squared out by hand with a chisel to minimise the amount of overhang, or the edge of the shelf can be radiused to match.
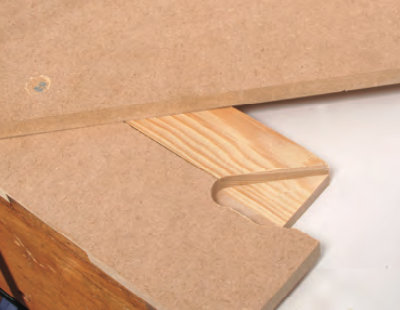
The dovetail housing is an extremely strong way of joining a shelf into a carcass side and is effectively one long sliding dovetail joint.
It doesn’t involve any complicated or expensive jigs. It produces a very neat joint that holds the shelf securely and prevents it from warping, but can still be left unglued to allow for any shrinkage across the width.
Dovetail housings, which are cut across the ends of the workpiece can be guided using a side-fence. The distance in from the board end being limited by the length of the standard side-fence rods. Longer fence rods can be used, but may reduce the accuracy due to flexing.
In either case, a longer face should be fitted to the fence to prevent the side-fence turning-in at the start and finish of the pass. A batten, equal in thickness to the workpiece, should be used to prevent break- out on the rear edge of the workpiece.
Dovetail housings which are cut across the width of the workpiece can be routed using a straight edge, a tee-square, clamp guide or even a homemade slot jig used with a router and fitted guide bush.
This jig can be fitted with a stop if the slot doesn’t go right across the board. Parallel housings can be spaced using a plunger dropped into each successive housing.
The dovetail housing has to be cut in one pass; you cannot vary the depth, although you can make a second pass to widen it.
If the initial cut is going to be too heavy for your router, remove the bulk of the waste with a straight cutter and then follow up with a dovetail one to produce the undercut.
For the mating half of the joint, the tail can be cut in several ways but is ideally cut on the router table.

This is easier, safer and more accurate than doing it freehand. For maximum support, the timber is held securely against the router table fence which is fitted with a flat sub face. A cutter aperture in the bottom edge, leaves enough space around the cutter for waste clearance.
In many instances, the length of the workpiece will make it impossible to cut the dovetail tongue on the router table, so you will need to do it with the router handheld. It is important that the router is given plenty of support to prevent it tipping by clamping a batten flush to the inside edge, or by making a simple L jig and a guide bush.
To minimise break-out, make a shallow back cut across the face of the joint from right to left first, before finishing off the full depth cut from left to right.
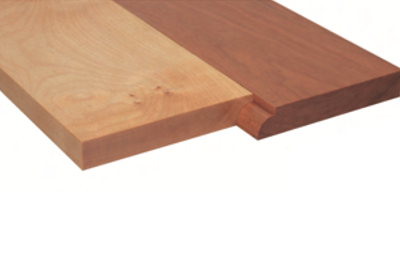
Rule joint
This joint is traditionally used on table tops where one leaf drops down to leave a decorative edge. It effectively disguises both the hinge and the gap between the two folding edges.
Two matched cutters are needed and the timber edges must be perfectly straight and true if the finished joint is to be even along the entire length of the tabletop.
The convex edge is cut with a standard ovolo cutter and the mating half is cut with a cove cutter, but the radii must match perfectly. The cutters may be plain or self guided, provided the thickness of the board allows support for the bearing.
For accuracy, the joint is best cut on the router table to make sure the cutter stays square to the work as any discrepancies will stop the joint hinging over properly. However, this may not be practical with large tops and you will need to use the side-fence. Also use a fine height adjuster to make sure the relative depths of cut are perfectly matched.
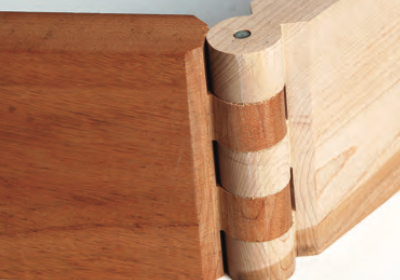
Knuckle joint
When two components have to fold against each other, a very neat alternative is the knuckle joint that can be cut with another dedicated cutter.